Wednesday, August 18, 2010

Ciao Bella

San Marzanos are what tomato sauce aficionados go gaga for. The small plum variety is considered by many to make the best tomato sauce. It is fleshier than most tomatoes, has a deep, robust flavor, few seeds, and low acidity. In fact the San Marzano gave birth to tomato sauce as we know it. Grown in the region of Campania (also home to pizza and macaroni), San Marzanos are exported all over the world, but can be grown anywhere with rich soil and warm breezes. Happy Boy Farms' Mediterranean climate suits them well and the people buying rave about the sauce they're making.

the gorgeous city of Campania


Usually, when someone tells you that a San Marzano tomato makes the penultimate tomato sauce you probably buy a couple 28 oz cans and try it for yourself. But since Happy Boy is growing them and since he knows I'm always game to cook, James brought home a flat of San Marzano tomatoes this weekend.


It was truly a labor of love; I have no food mill.

As I am holding out for a cute one like this.


...and so, I peeled them all by hand.

While peeling them, I thought a lot about the factory workers in Italy who peel the tomatoes for canning. Surely someone, not a machine, must do this, right? It's a delicate, tedious task and a machine would surely destroy the fruit in the process. But someone must have figured out how to have a machine do the work by now. Even so, it most certainly was once a human task. I thought of James' Nonna who immigrated to San Francisco from Monfalcone, Italy around 1956 and got a job stuffing olives with pimentos. I don't know about doing it as a full-time job, but I actually enjoyed the work: the cold plunge in the ice bath, the intense heat of the tomato in my hand, the stripping of its skin, its silky denuded body in my hands, watching my pile of gems grow. Peeling a flat of tomatoes is a tedious but sensory-rich task and if you're feeling game I have a few words of advice:

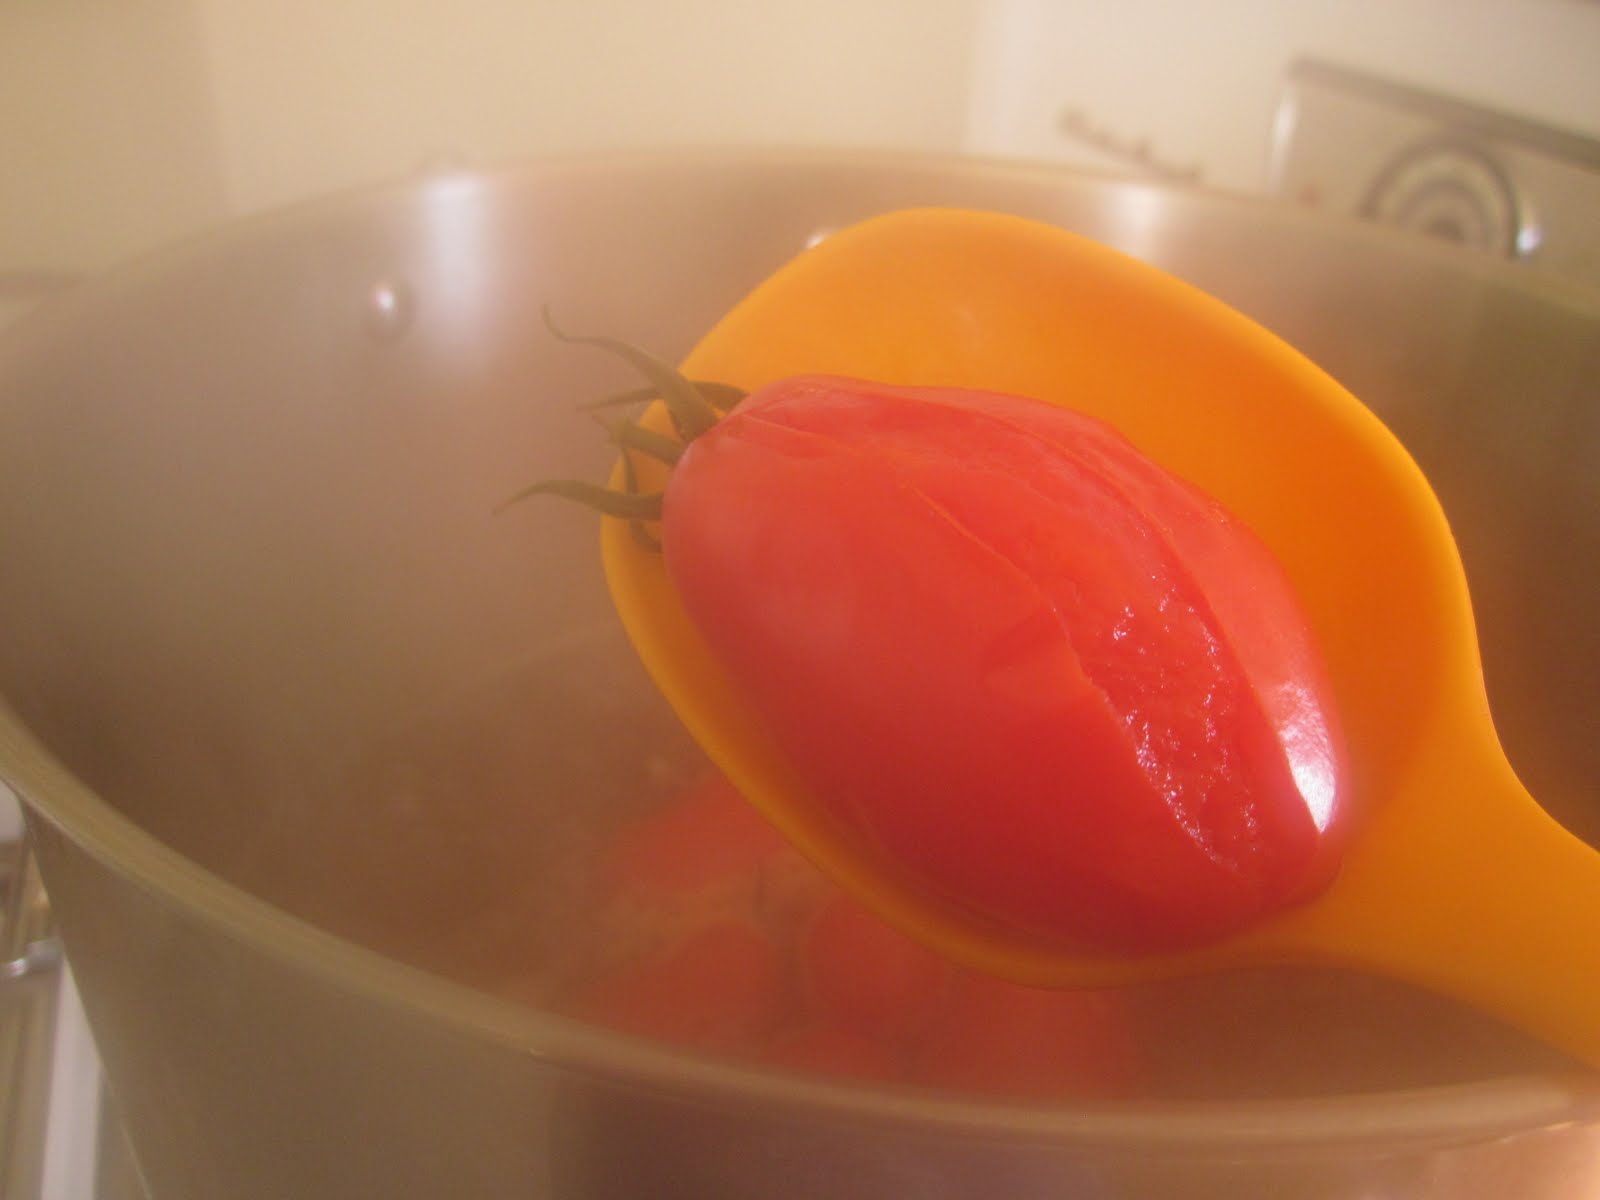
1. You will need to boil the tomatoes to loosen the skins to peel. I did this in two batches, standing vigil at the pot with a neighboring colander and slotted spoon at the ready to scoop as they pop their skins. You'd be surprised how long it takes some of them to pop. The skins are their strongest defense and this is why I'm peeling them; curls of tough tomato skin are not a good texture in sauce. If you listen carefully, you can sometimes hear the release of a gentle puff of air as the tomato skin breaks at the surface.


2. Have a large bowl of ice water at your elbow. The tomatoes can be plunged in the ice water, but they shouldn't really soak in it. Not only will the ice water shock the stubbornest tomato into popping their jacket, but it will be there to rescue you when you burn your little paws on these piping hot fruits. Even after plunging into ice water they retain quite a bit of heat and you will need to cool your fingers a bit.


3. The best way I found to peel them is to grab the stem, where the plant holds onto its fruit the most tenaciously, and sort of squeeze the tomato out of its skin, pinching the stem to pull the skin off in one movement. The fruit should just slide out of its little jacket and into your bowl.


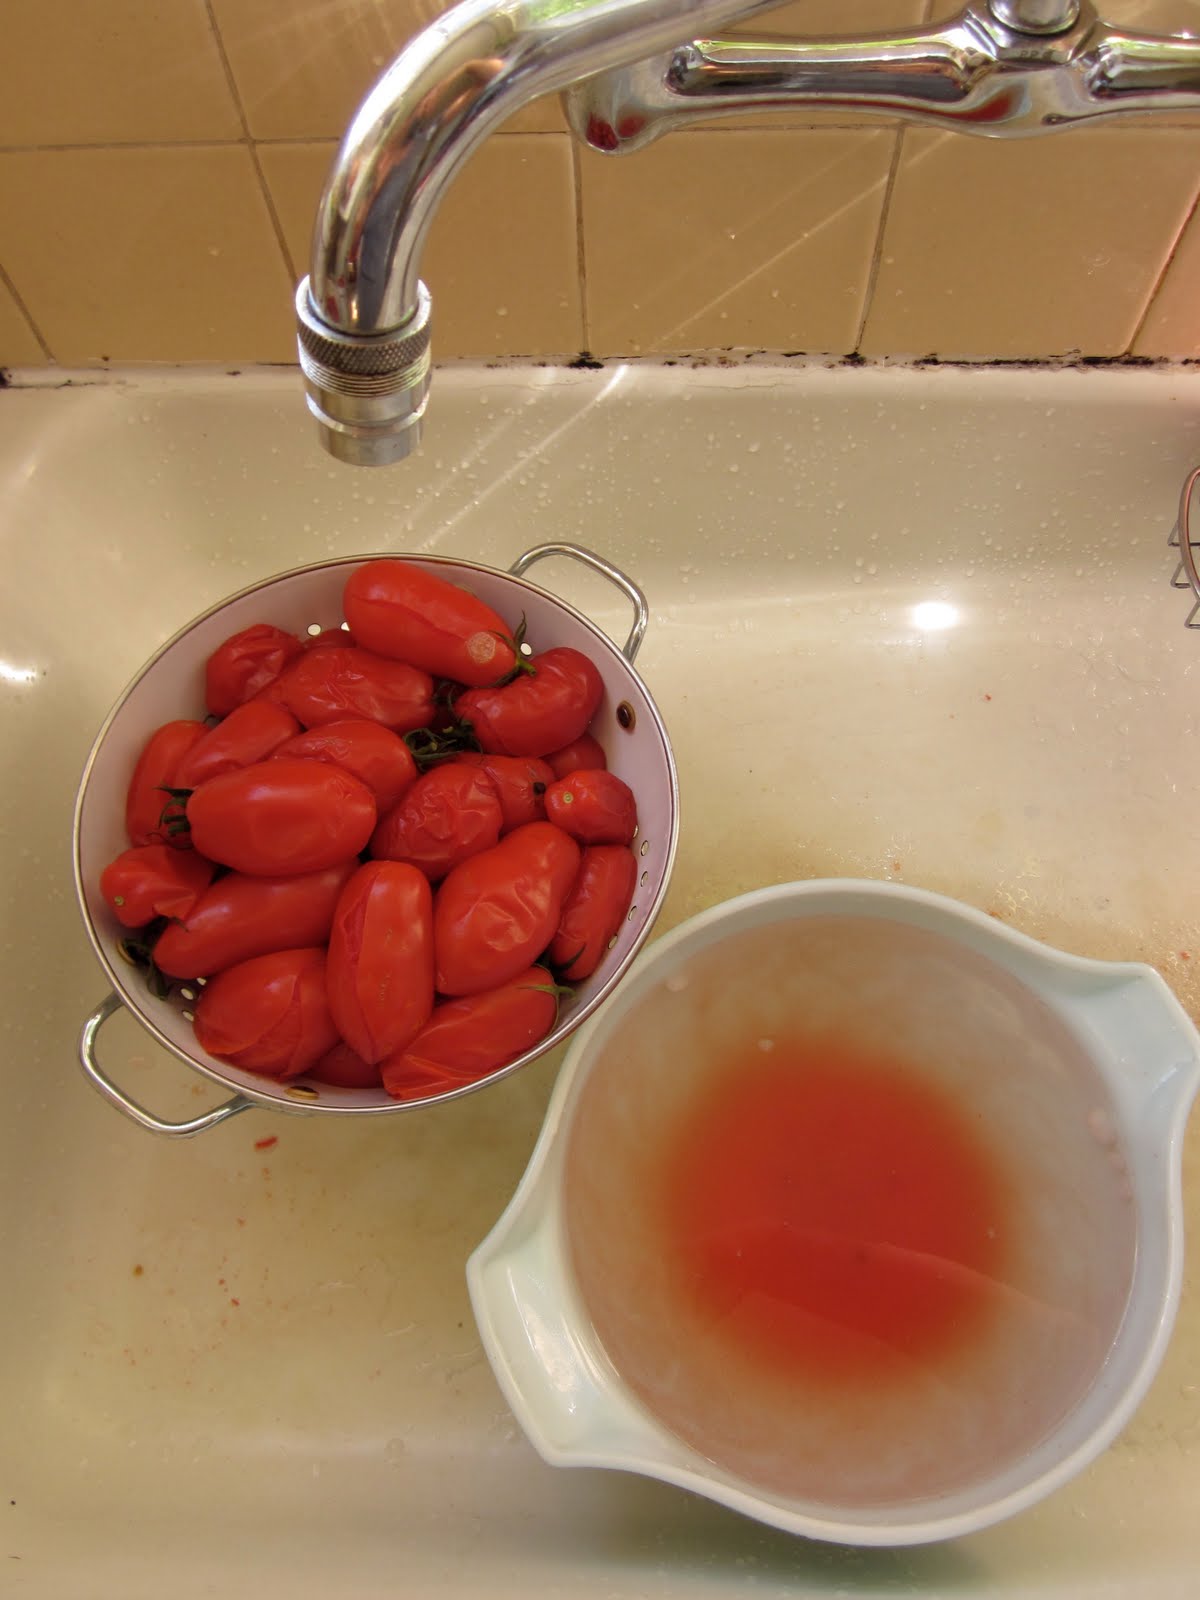
After peeling them all, I was left with this:

100 oz of whole peeled San Marzanos

Now to make the sauce!

I decided on two, a vegetarian one and a meat one.

They are exactly the same, except that one has four spicy Italian sausages (pre-cooked and drained of fat) added to the pot.

Basic San Marzano Tomato Sauce

6 T olive oil
1 large onion, chopped
4 cloves of garlic, sliced
1/2 medium carrot, finely shredded
56 oz whole, peeled San Marzano tomatoes (that's two 28 oz cans for those of you using cans)
1/4 C fresh basil, chiffonaded
Salt and Pepper to taste

1. Sweat the onions over med-high heat in olive oil until carmelized. This could take up to 15 minutes.
2. Add garlic and saute for two more minutes, until aromatic.
3. Add carrots and saute for another few minutes.
3a. If you are making a meat sauce add the cooked and drained crumbles now.
4. Add tomatoes that have been quickly pulsed with their juices in a cuisinart or put through a food mill.
5. Stir frequently at medium heat till slightly reduced.
6. Stir in basil, salt and pepper.

Meat Sauce

Vegetarian Sauce


My hard-won and delicious dinner.


Saturday, August 14, 2010

Es un Salsa...Muy Salsa


If you're familiar with this tag-line, Es un salsa...muy salsa, then you're probably familiar with Tapatio, that delicious hot sauce with the handsome man from Jalisco on the label.

Used to be that only this handsome man knew the secret of my own salsa recipe, which I unabashedly stole from James, the other handsome man in my life. But thanks to blogger, it is no longer a secret. I share with you the recipe for a salsa...a most amazing salsa:

Heirloom Tomato Salsa

4 C chopped heirloom tomatoes, about 5-6 med-large tomatoes
1/4 C minced red onion
1/2 C chopped cilantro
1/2-1 jalapeno (depending on how spicy you like it with or without seeds), minced
juice of one lime
a couple splashes of Tapatio
a couple splashes of apple cider vinegar
salt and pepper to taste


Combine in a large bowl...
and serve!


Tuesday, August 10, 2010

Panzanella


Happy Boy Heirloom Tomatoes, arguably the best product they have all year, are rolling in stem over blossom scar at a rate that I have a difficult time keeping up with! I'm talking Brandywine, Red, Pink, Yellow,
and Black Brandywine, Cherokee Purple, Green Zebra, Paul Robeson, and Early Girls!

As a kid I hated tomatoes, probably because all we ever ate were the sad tasteless globes the tomato-growing industry delivered year-round to the local Food Lion. Back then I never could have told you that tomatoes have a definitive season. Now I don't even bother buying tomatoes out of season. I don't see the point. I would rather wait till summer to have that BLT than waste my money and support an industry that picks tomatoes rock-hard and green, then treats them with ethylene gas (the plant's natural ripening agent) to soften and redden them for delivery. This is to say nothing of what growing tomatoes in a monoculture has done for the environment or human rights and health.

You've probably guessed by now that the next few posts will be about tomatoes, as the glut on my counter begs to be put to good use.


Panzanella, or bread salad, is one of my favorite things to do with summertime tomatoes. If you've never heard of it, you may be thinking
Bread? Salad? I thought they were mutually exclusive? And in most countries you'd be right, but Panzanella is Italian and the Italians are masters of incorporating bread, especially stale bread, into all sorts of things including salad. Usually these dishes have the word paisano, or peasant, in there somewhere.

The main ingredients are
bread (good bread if you have it and on the stale side, but not like crouton hard or break your teeth on that green tomato hard. I used Tartine's bread which is maybe the best bread I've ever had.) and tomatoes (delicious, ripe, and in season, puh-lease). For obvious reasons I made mine heavy on the tomato and, if you like, you can add cubed red and yellow peppers.


A note of worth: panzanella is best at its freshest, so plan/reduce recipe as you see fit and unless cold soggy bread is your thing, I don't recommend keeping this for leftovers. Unless--UNLESS--you warm it in a saute pan for breakfast and serve it with a poached or fried egg on top. I call it Italian Peasant Breakfast and it's friggin' gooooood.

Panzanella

3 T olive oil
6 C cubed crusty/french bread
1 tsp salt
3 large tomatoes, cubed
1 cucumber, cut in 1/2" slice
1/2 red onion, sauteed in olive oil
20 basil leaves, cut into a chiffonnade
3 T capers, optional

1. Heat olive oil in a large saute pan and then add cubed bread and salt and stir/toss to coat in oil. Brown till golden on med-high heat. Remove to a large bowl.

2. Saute onion in leftover pan oil till softened and then add to bread.

3. Add everything else to the bowl, including the following vinaigrette and toss to coat. If you can resist eating it all then, let the panzanella sit for about 10 minutes, allowing the flavors to marry and the bread to get the perfect amount of moist before digging in.

Vinaigrette:

1 tsp minced garlic
1/2 tsp dijon
3 T champagne vinegar
1/2 C olive oil
1/2 tsp salt
1/4 tsp pepper

1. Add everything to a jar with a well-sealing lid and then shake it till emulsified. This vinaigrette is delicious on green salad as well, so why not make extra?


Friday, August 6, 2010

Afternoon Delight

Recently a friend of mine, we'll call him Fabuloso, acquired a windfall of his own--an amazing house! Not only is the house his very own, but it's also in an awesome location, super freaking cute, and includes a huge backyard with a virtual wall of blackberry bushes. Double windfall!

I asked Fabuloso if I could stop by on Thursday to pick some berries to add to my peach crisp and he said, Stop by anytime. So I did mid-afternoon and found the house quiet with a door open. I knocked a few times, but didn't see any sign of Fabuloso, so I walked around to the open door and called his name.

Fabuloso appeared seconds later and said surprised, Oh, it's you, you're here!
Yeah, I said, I knocked, but you must have not heard me.
Oh, I heard you. I'm having sex.

I think I turned bright red. Yes, dear friends, I was embarrassed. I stop by to mooch off someone's good fortune and interrupt another good fortune.

Apologies stumbled awkwardly from my mouth, but he graciously waved them off and said, Go pick some berries, which I did, albeit self-consciously, snatching ripe and under-ripe alike, in an effort to pick as few as I thought my crisp could get away with. I was so flustered I even forgot to take a picture of the bush buzzing with bees and heavy with fruit.

I had decided to call this recipe Dori's Almond Crumb Crisp, as it is James' mom's recipe handed down to me, but instead I think I will call it Afternoon Delight.

Afternoon Delight, aka Dori's Almond Crumb Crisp

Inside:
5 C sliced fruit and/or berries
1 T sugar, optional
1 tsp lemon juice

Topping:
1 C flour
1/2 C sugar
1/2 C butter, cut into small cubes
1 C chopped almonds
1/2 tsp almond extract
1 tsp vanilla extract

1. Combine inside ingredients and pour into 8x8 pan.


2. Combine topping ingredients in a large bowl. For ease in mixing, a steep-sided bowl is best so you don't fling crumbs everywhere. Use a pastry-cutter or two forks to cut butter evenly into the crumb. Cover fruit with topping.


3. Bake at 375 degrees for about 30 minutes or until top in browned. Cool on a rack. Serve warm with ice cream, creme fraiche, or whipped cream.


Thursday, August 5, 2010

"The coldest winter I ever spent was a summer in San Francisco." -Mark Twain

While not the coldest summer on record, this summer in the Bay Area has been colder than average. I awake to gray skies, often a fine mist falling. I often wonder, why do I live here again? I grew up in Virginia, where the high 80s was considered a reprieve in summer. Often it was 80 before 9 am. In Oakland today at 9:30 am it is a whopping 57 degrees and has been for the last few weeks, warming to 62, maybe 65!, around 1 pm. It is warmer in Anchorage, Alaska for pity's sake!

When the sun does break, it is glorious for a few hours. Check out our garden loving that hot sun:

By 6 pm, I fretfully watch as the fog monster rolls back over San Francisco, pulled across the Bay by someone in the hot Central Valley desiring a chilled misty breeze. In the Berkeley Hills someone is wearing a hat and scarf, perhaps even a parka. The contrast is startling and after four years it still boggles my brain. T
his is summer?


Needing something hot to wrap my cold hands around, I looked at the glut of not-so-perfect Happy Boy corn brought home from the farmer's market and saw soup. Corn is proof that somewhere it really is hot and also that Happy Boy Farms is not perfect. Though they grow so many things pretty and perfect, corn is just not one of them, but keep trying guys! This delicious corn soup, called
Crema de Flores de Calabaza (meaning Cream of Squash Blossoms) tempered both chilly nights and James' lunch hour, sometimes taken in the foggiest of San Francisco neighborhoods:


Crema de Flores de Calabaza

1 1/2 T butter
1 large onion, chopped
3 C chicken or vegetable broth
1 small potato, peeled if you like, and chopped
~25 squash blossoms, with sepals, stems, and stamens removed
2 peppers, chopped (Any of the milder variety will do. I used a sweet red one and two banana peppers that I had on hand, but a poblano would have been great too. If you like spicy soup, try a hot pepper.)
1 C milk
1 medium zucchini, chopped
3-4 ears of corn, kernels removed
1/2 C heavy cream, optional
1/2 tsp salt
1/2 tsp cracked black pepper
Parsley, cilantro, or epazote to garnish

1. Melt butter in medium heavy-bottomed sauce pan over med-high heat. Add chopped onion and saute until browned, about 10 minutes. Scoop out half of onions and reserve for later.

2. Add chopped potato and broth, bring to a boil, then lower to a simmer and hold there for ~20 minutes or until potatoes are tender.

3. While potatoes are cooking, remove the sepals, which are the hard green star-shaped things at the base. You can remove the stem, sepals, and stamen in one move if you pinch the blossom close to the base with your left hand and use your right fingers to pinch and tear the greenery off, gently releasing your left hand's hold to let the stamen slide out.
Cut blossoms into 1/4" strips, starting at base and working toward tip. In the soup these will look like yellow-orange ribbons.

4. When potatoes are done, puree the mixture in batches. This will create a smooth creamy base for the rest of the soup. Return puree to pot, but keep burner off while you complete step 5.

5. Blister chilies on an open gas burner or in a broiler, rotating to evenly blister on all sides. This takes about 6-10 minutes. Remove and promptly wrap in a kitchen towel for about 5 minutes. This allows the steam to loosen the skins, which you will then remove by rolling in a paper towel (or a kitchen towel that you don't mind getting char on). Running the pepper under cold water also helps in the skin removal process. Remove stems and seeds and chop into small pieces.
If this too much effort for you (but remember: it's a good way to get your hands warm) then just skip the blistering and go straight to the chopping, only cook the soup a little longer to thoroughly cook the peppers.

6. Add chopped peppers, zucchini, corn, reserved onions, half of squash blossoms, and milk. Simmer about 10 minutes.

7. Lower heat to warm and swirl in heavy cream, rest of squash blossoms, and salt and pepper to taste.

8. Garnish with your choice of herbs and enjoy!


A good way to warm your hands around the "fire"

A cute variety of zucchini called patty pans

Pretty, pretty compost

A gorgeous bouquet

Tuesday, August 3, 2010

A Flat of Peaches

What to do with a flat of moldering, festering Kashiwase peaches?
Make cobbler? Yes.
Make popsicles? Definitely.
Use them as bait for your carniverous plant? Sure, why not!

For my birthday James got me this adorable Venus Flytrap. What better way to say I love you than a Venus Flytrap? I've been concerned whether it's getting enough to eat (typical me), so the other day I baited my trap with the peaches the fruit flies had their hearts set on:


Look at those peaches. They are disgusting. Oozing and weeping with sweet sugary juice. Most people would compost these, but not me. I put my superior peel-and-cut-the-fruit-while-it's-in-your-hand skill to use. Of course, I let the Flytrap have a go at the fruit flies first. Though it turns out it takes quite a bit of movement for the Venus Flytrap to snatch at its prey. After a day of waiting for the Flytrap to work its magic, I took over and just smacked one of the little bumbling flies in between my hands and fed it to the Flytrap manually. It snapped shut so fast I shouted.

After composting about a third of the flesh that was too bruised and battered to eat, I was left with about five cups of elegant white peaches. The first thing I made was popsicles, because lately I crave popsicles. It's not even that hot around here, but for some reason I find them so satisfying. Also, they are incredibly easy. So maybe I'm just lazy.

For these I was just going to puree ~2 cups of the flesh and then add a 1/4 cup of limeade that I had in the fridge, but as the blender was whirring away I slipped one of the slices from the bowl into my mouth and had a flash of genius as the subtle floral bouquet of white peach filled my mouth. Rose water! I had a bottle of this that we once bought intending to make lassi and then never did. I found it and added to the mixture about a tablespoon and then tasted. Pretty good, but white peaches aren't as high in sugars as yellow peaches so I added about three tablespoons of agave nectar. Simple syrup would work here too (just add a little less since it is sweeter), but again, I was feeling lazy, and when else am I going to use that agave nectar that Cathy gave me when she moved? Thanks, Cathy! Wish you were here to try one of these popsicles, because, man oh man, were they amazing. Better than the melon popsicles even, though not as nostalgic. I will post the peach cobbler I made another day.


White Peach, Rose Water, and Limeade Popsicle Recipe

Add to a blender or cuisinart, the following and blend till smooth:

~2 cups peeled and sliced white peaches
1 T rose water
1/4 C limeade
3 T agave nectar

Pour into molds or ice cube trays, reserving about 1/4" at the top to allow for expansion. Freeze for at least two hours.

Monday, August 2, 2010

Paletas de Melon

It is finally melon season at Happy Boy Farms and the customers are snatching them up left and right, so yesterday James was only able to bring home a single cantaloupe, which of all melons is his least favorite. But to me its musky sweet smell spells hot summer days wandering through cobblestone streets.

When I lived in Mexico I had a very routine life. As usual, most of my routine revolved around food. I didn't have a lot of money so I ate mostly at home, which as most single people know, it can get pretty hard to motivate oneself to eat healthy, much less eat at all, when it's just yourself you're cooking for. Yet I persisted and to start my day off right I would have coffee and granola with yogurt. By lunchtime I'd be prepping a salad. Since it's so hot in Mexico it is hard to have a lot of fresh produce. The heads of lettuce I would find in the grocery store were always wilty, but I would buy them anyway and crunch up my salad with cabbage, carrot, and pepper. I typically a
dded canned tuna fish dressed up with lime, olive oil and a bit of red onion to my salad. I spent my afternoons opening and closing the fridge to discover that, yes, it still only had salad fixings and maybe a stack of tortillas.

Eventually my hunger drove me down the hill to town. One thing that I looked forward to (and still do when I get to visit) was my daily popsicle, called a
paleta in spanish and only one dollar! The best friggin' dollar you ever spent. In Mexico the paleta is an art form and in practically every city you can find a paleteria, where there are paletas of most any flavor you can imagine. Hibiscus, guava, pineapple, pistachio, strawberry, yogurt...but my favorite of them all was melon. Melon, pronounced meh-lone. So refreshing, so cold and sweet, with small bits of fruit mixed in before frozen. I relished that popsicle. Only two other treats conjure up such exquisite, rhapsodic memories of my time in Mexico--palomitas con salsa (that's popcorn with Tapatio salsa drizzled over it) and adobada tacos. Deee-licious!

So when James presented the scorned cantaloupe, I knew exactly what I would be using that melon for:
paletas de melon!

The possibilities for popsicles are endless when you really think about it. All you need is fruit, water, a blender, and a popsicle mold or an ice tray and sticks.

For these, I used one small cantaloupe, which made about 2 cups of puree, plus the reserved 1/4 of the melon I chopped into small pieces to mix in at the end. I added the juice of a lime for fun, but if you wanted you could just add about four tablespoons of water to thin it out before adding the melon chunks and pouring it into the molds. Depending on your freezer you could be in Mexico in about two hours.